Host react (or any static site) on AWS S3 and CloudFront
Scalable, resilient and cost-effective static site hosting on AWS S3 and CloudFront.
In this post, we will discuss how to do it using via the web console and command line.
What we’ll achieve?
- Static site hosting with “mod_rewrite” redirect to index page to make react-router (or any html5 router) happy
- Serve site through CloudFront CDN for quicker page load
- Easy page deploy using
awsCLI command
What do we need?
- Any static Html/js files. If you bootstrapped react app with
create-react-appthen it’s generated contents ofbuilddir after runningnpm run build - AWS account :)
Setting up Infrastructure
Create an s3 bucket
Let’s assume that we will create an s3 bucket with the name “site-hosting-kb”. Remember that bucket name must be globally unique, so it must not collide with name from any other aws user. If you already have a domain, a good idea would be to use it as a bucket name, i.e. “kamilbiela-github-io”. Makes things a little bit easier to remember :).
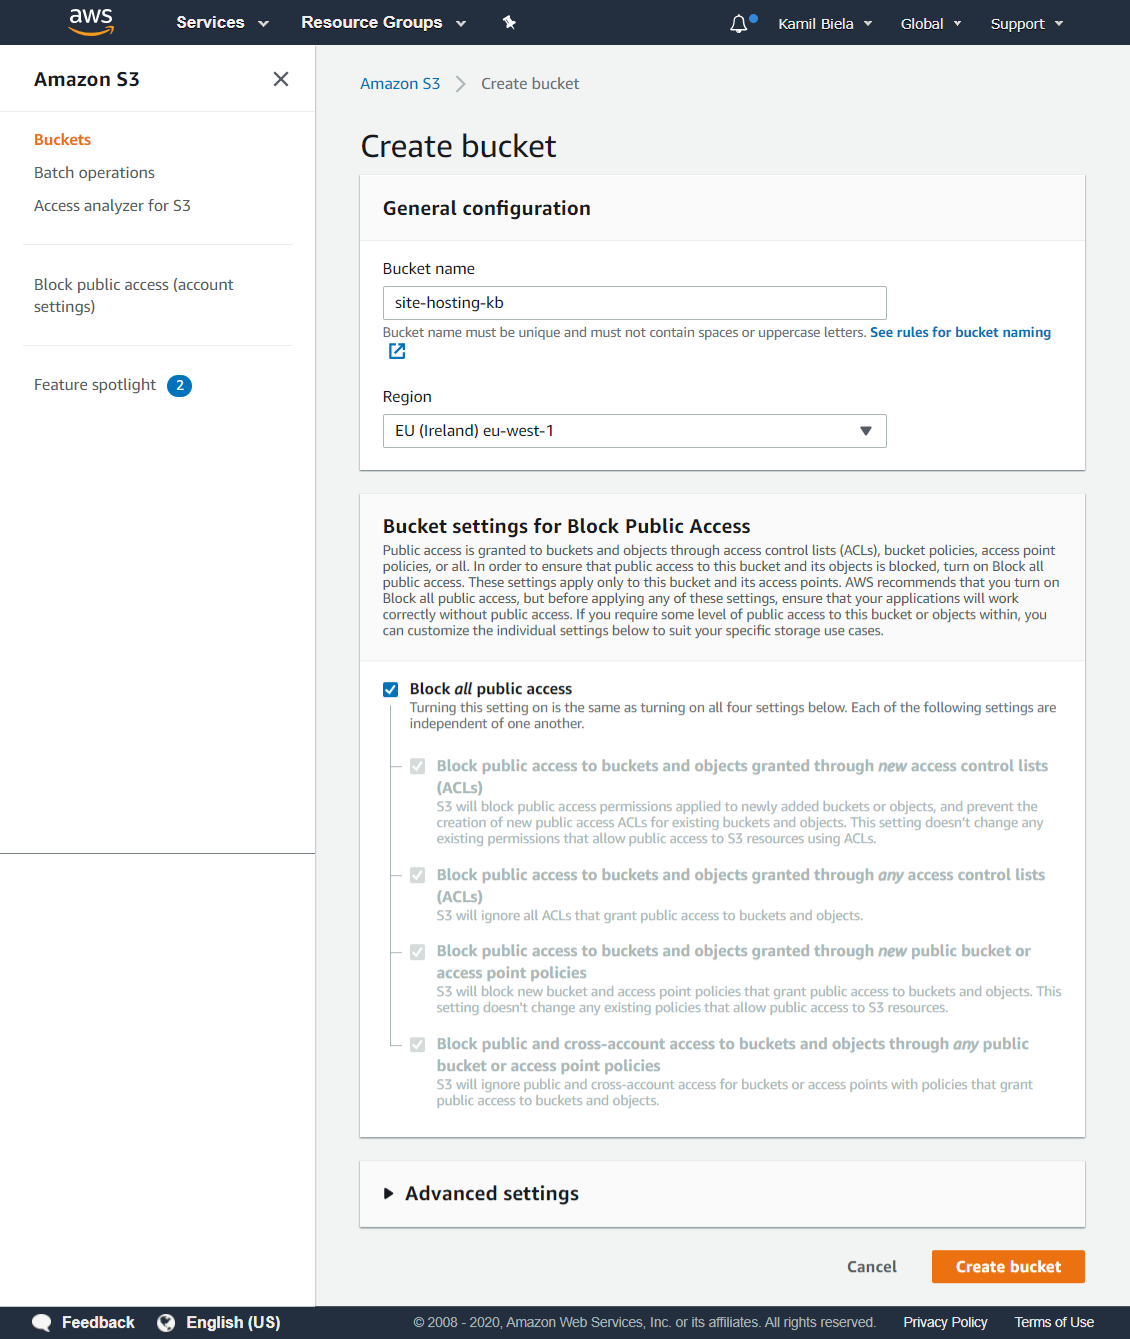
To create a bucket in AWS console:
- go to S3 service and then to “Create Bucket”
- In the creation form enter bucket name. Select region which makes the most sense as bucket location - we will be serving files through CloudFront so real criteria is that datacenter is physically close to you. Latency and speed will be a little bit better for you when uploading site files.
- Important Check “Block all public access” - we don’t want users to somehow access our site directly, or that web search crawler index it using s3 bucket URL somehow. Changing that has implications for configuring CloudFront - It changes HTTP status code response when a file is not found. Instead of 404, it will report 403 back to CloudFront.
- Other settings leave as they are
Create CloudFront distribution
To create a cloudfront distribution:
- go to cloudfront service and then to “create distribution”
- Select Web as a delivery method
- In form - Origin Settings:
- Origin Domain Name: select created s3 bucket
- Origin Path: “/public”
- Origin Id: leave default
- Restrict Bucket Access: Yes
- Origin Access Identity: Create New Identity
- Comment: site-hosting-kb/public
- Grant Read Permissions on Bucket: “Yes”
- this will create s3 bucket policy document and apply it, have a look at the next paragraph where I explain it.
- Origin Custom Headers: none
- It’s usable if you want to put CloudFront in front of a web server like apache.
- In form - Default Cache Behaviour Settings - leave default settings as they are with the exception of:
- Viewer Protocol Policy: Redirect HTTP to HTTPS
- we disallow non-encrypted access to our website to protect site visitor privacy
- Viewer Protocol Policy: Redirect HTTP to HTTPS
In Distribution settings, we can configure two important things: custom domain and logging. I will tackle setting custom domain in a separate article, for now, we will use the default domain provided by CloudFront. So leave all values default for now and click “Create distribution”.
In the list, we should see our new distribution.
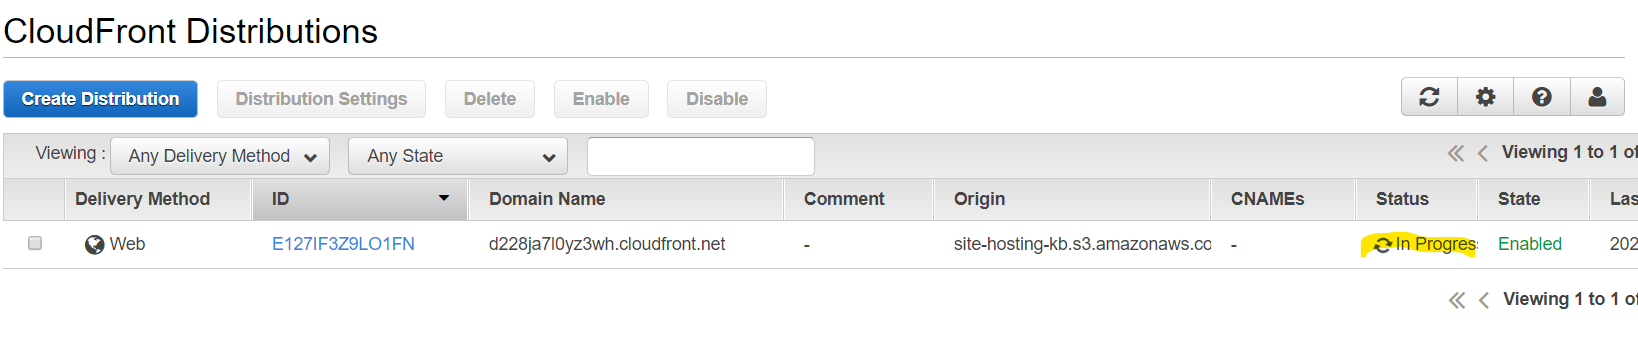 Wait for the status to be changed from “In Progress” to “Deployed”. It will take a couple of minutes.
Now important step, we need to configure CloudFormation to redirect to our index.html page if the file doesn’t exist in the bucket. This will allow the html5 router to work.
In order to do so:
- click on the CloudFront Distribution Id in the Distributions list
- select “Error Pages” tab
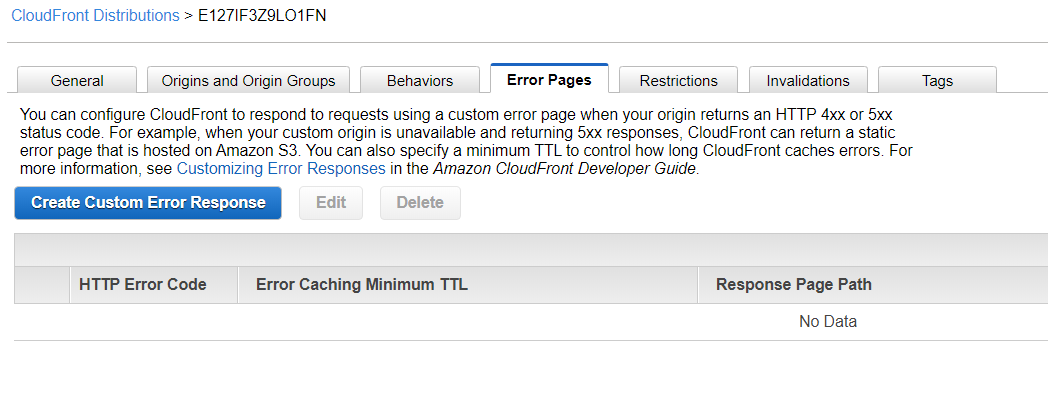
- click “Create Custom Error Response”
In the form:
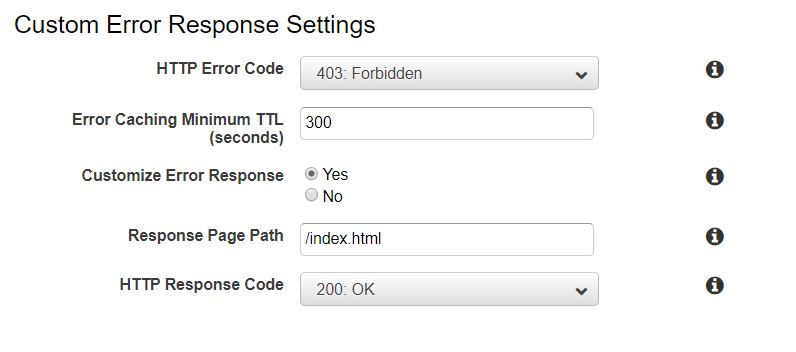
- HTTP Error Code: 403 Forbidden
- Since we don’t allow public access to our s3 bucket, we need to create a special rule for the
403 ForbiddenHTTP error response. S3 bucket will respond with it every time when a file is not found in the bucket.
- Since we don’t allow public access to our s3 bucket, we need to create a special rule for the
- Customize Error Response: Yes
- Response Page Path: /index.html
- HTTP Response Code: 200 OK
- Save the form, go back to the Distribution list and wait for state change to “Deployed”
Remember that CloudFromation caches response, so if you’re testing different settings, you need to create invalidation - more on that later.
How CloudFront grants itself read access to non-public s3 bucket
When creating CloudFront distribution you select the option “Grant Read Permissions on Bucket” CloudFront updates “Bucket Policy”.
You can find it after selecting the bucket (in s3 section of AWS Console), selecting the “Permissions” tab, click the “Bucket Policy” subtab.
You should be able to see something like that:
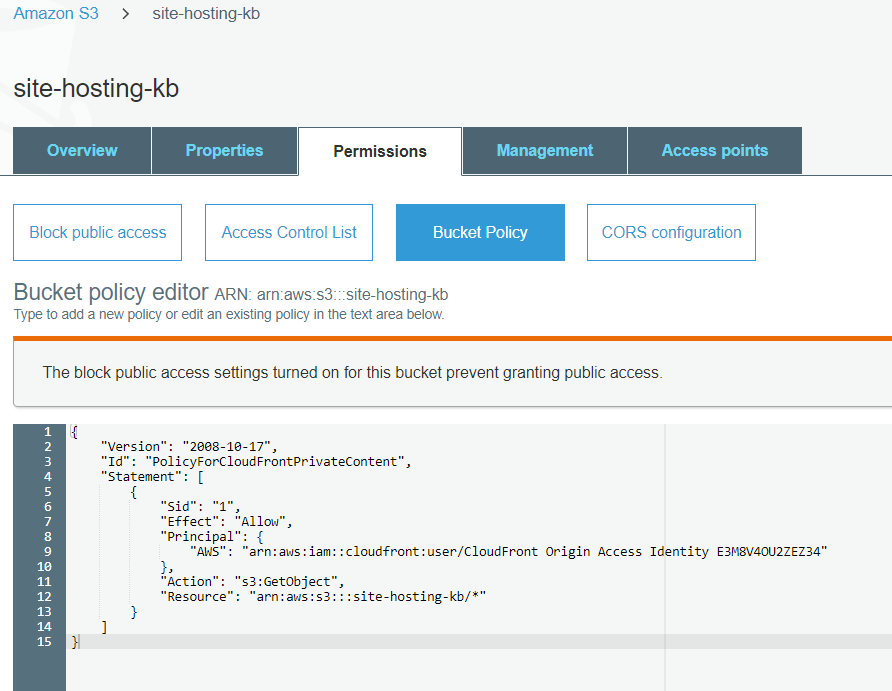
{
    "Version": "2008-10-17",
    "Id": "PolicyForCloudFrontPrivateContent",
    "Statement": [
        {
            "Sid": "1",
            "Effect": "Allow",
            "Principal": {
                "AWS": "arn:aws:iam::cloudfront:user/CloudFront Origin Access Identity E3M8V4OU2ZEZ34"
            },
            "Action": "s3:GetObject",
            "Resource": "arn:aws:s3:::site-hosting-kb/*"
        }
    ]
}
A little bit of explanation what’s here:
- Contents of
Statementis an actual policy document. Sidcan be any string you like.Actionis a list of actions that we allowPrincipalto issue on ourResource.Resourceis the Arn of the bucket with the path.
If you want to generate your own policy for s3 or any other service, use AWS Policy Generator
Upload files to s3 bucket
Easiest way to do it is to use aws cli interface, you can install one using using these instructions.
First, I’ll show how to do it using the web console. To upload files to s3 bucket, just go to the bucket list on AWS web console, click bucket name, click “create folder” and create the public directory. Next, click the folder and then ‘Upload’ button and upload all the files.
But I recommend taking the cli route since it’s much easier to set important file headers for browser.
This step can be done with one AWS cli command. Let’s assume that our project builds into build directory and we want to upload contents of build into the public directory in our s3 bucket:
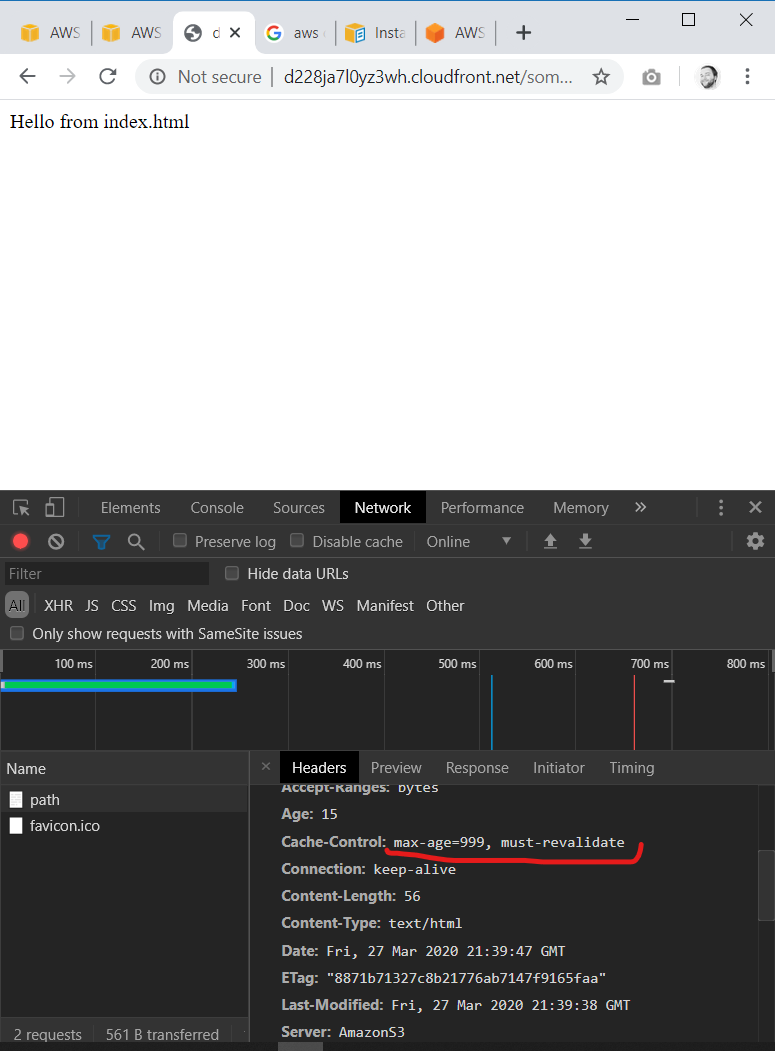
aws s3 sync build "s3://site-hosting-kb/public" --include "*" --cache-control "max-age=999, must-revalidate"
Notice the --cache-control - this value will be passed to the browser as-is for the requested file. It forces the browser to check/refetch our file after 999 seconds.
The lower value the sooner uploaded files will be refetched by your users, but on the other hand, it also means an increased number of requests and traffic to CloudFront.
Just to be sure, go to the bucket directory and see if files are uploaded where you wanted them to be.
The CloudFormation won’t fetch the new files until we either wait or manually invalidate the CloudFormation cache.
Invalidate CloudFront caches
If you want new files to be propagated to CloudFromation distribution as fast as possible, you need to clear (invalidate) CloudFormation cache.
To invalidate cache via aws web console:
- go to CloudFormation distributions list
- click distribution
- select “Invalidations” tab
- click “Create invalidation”
- in Object Paths enter:
/*to invalidate all the files. - Click ‘Invalidate’ button and wait for invalidation to finish
You can achieve the same thing by running this one-liner, just change the value of the --distribution-id to the id of your CloudFormation distribution id:
aws cloudfront create-invalidation --distribution-id E127IF3Z9LO1FN --paths "/*"
Done!
You now are in possession scalable, cloud-hosted website :).
Leave a comment if something is not clear or you have a problem.